


 Since it was first announced back in October of 2017 (then designated the Mk5) the Block II has never been called upon for a mission due to the Block I out-performing all expectations and delivering sub-orbital payloads to the region of space above 250km that the Block II was originally designed for. After months of using Block I rockets to explore the hazardous radiation region above the planet, the need for higher flights has finally allowed the Block II the chance to prove its worth. The first mission was launched last week and once again the Progenitor team was blown away by the results.
The Flight
With no issues leading up to launch, the rocket lit off all 5 of its first stage solid rocket engines and left the launch base in a pillar of fire at 12:03:00.04 local time. This produced an initial combined force of 6.2Gs which, coupled with the added weight near the nose of extra batteries for the longer flight, prevented the greater length of the rocket compared to the Block I from creating too much drag at the nose and flip over to the west. In fact, the rocket immediately began to pitch downwards upon leaving the launch base, dropping from 85° launch position to 80° in the first 5 seconds. By this point the radial boosters had done their job aiding the center core booster in overcoming the additional 129kg of fuel and parts (not to mention the weight of the boosters themselves) added to the rocket design in the Block II. They separated, however two of the boosters caught the fins of the lower stage as the rocket began to spin up. Thankfully this did not have a hugely adverse effect on the ascent.
At this point the flight was very similar to that of a Block I rocket. The center core booster is the exact same as flown on a Block I, with the same core design gradually tapering off thrust to prevent the rocket from accelerating too quickly in the lower atmosphere. The rocket passed through Max Q at 85.366kPa, which is slightly above the 80kPa we try to keep rockets below but not enough to cause concern. As usual, 35 seconds into the flight the first stage core booster was detached, its fins shredding to spoil its aerodynamics and ensure a splashdown downrange. The extra push at launch caused this event to happen roughly 2km higher compared to the Block I, at around 17km ASL. Separation induced a slight wobble in the rocket’s spin, but it was not enough to violate AoA constraints and turn over staging commands to controllers. The rocket then coasted until its nose dropped 1.5° from the time of stage separation, which took 7.9 seconds. The second stage booster lit off at L+43 seconds, 21.7km in altitude. Once it expired 12.14 seconds later, it was decoupled and the third stage kicked off one second afterwards at full thrust for the final push.
The rocket exited the atmosphere at L+1m31s and 17 seconds later the Automated Flight Control System cut off the fuel valves to terminate the burn when it detected the apokee exceeding 900km. This was done to keep the rocket within range of receivers on the ground, at KSC initially and then aboard the recovery vessel downrange. Although the onboard antenna can reach out 1Mm (and a bit further though not as reliably) a rocket that is at 1Mm altitude but not directly overhead is thus more than 1Mm away.
Climbing to its apokee of 900.78km the rocket continued to gradually spin further and further off its prograde vector, until by the time it was returning towards the atmosphere it was laid out in a flat spin (very similar to how the Mk5 Block I returned on its second flight). It began to re-enter the atmosphere at L+36m52s, quickly going from a flat spin to an end-over-end tumble with G forces building quickly. After just 19 seconds and nearing 17Gs the rocket broke up at 25km, with both fuel tanks and the engine ripping away.
The probe core and payload above remained relatively undamaged, and the AFCS remained unfazed at the loss of half the rocket as it was no longer concerned with any of those parts. The rocket endured a few more seconds of intense heating before falling below 14km and beginning to slow down to terminal velocity in the lower atmosphere. The payload went transonic at 11km and by 6km had reached a speed that was safe for chutes to be deployed. The canopy fully extended at 300m to land the remainder of the rocket safely in the Kerblantic 265.376km downrange.
Flight Analysis
Overall this was an exceptionally well-flown mission. Using all the data gained from Block I flights the Progenitor team was able to actually model the rocket behavior prior to flight for the first time, which allowed them to determine things like how fast the rocket should be launched to ensure it continues to track downrange. There were still some surprises of course, but being able to avoid losing the rocket right after launch was what gave the mission the chance to succeed.
Spin Precession
The major anomaly this flight was the rocket’s large precession during its coast through space, eventually growing so large it was laid out flat relative to the planet. The first suspect for this problem was mentioned in the previous section when the radial boosters impacted with the large lower stage fins upon separation. However although this did cause some imbalance to as much as 0.6° AoA, the rocket re-stabilized during the remainder of the boost to less than a tenth of a degree AoA. In fact, the first stage boost was extremely stable compared to the Block I, which across 5 flights averaged 0.33° AoA whereas the Block II first stage boost averaged just 0.16° AoA. However it was after the first stage was decoupled that the trouble began.
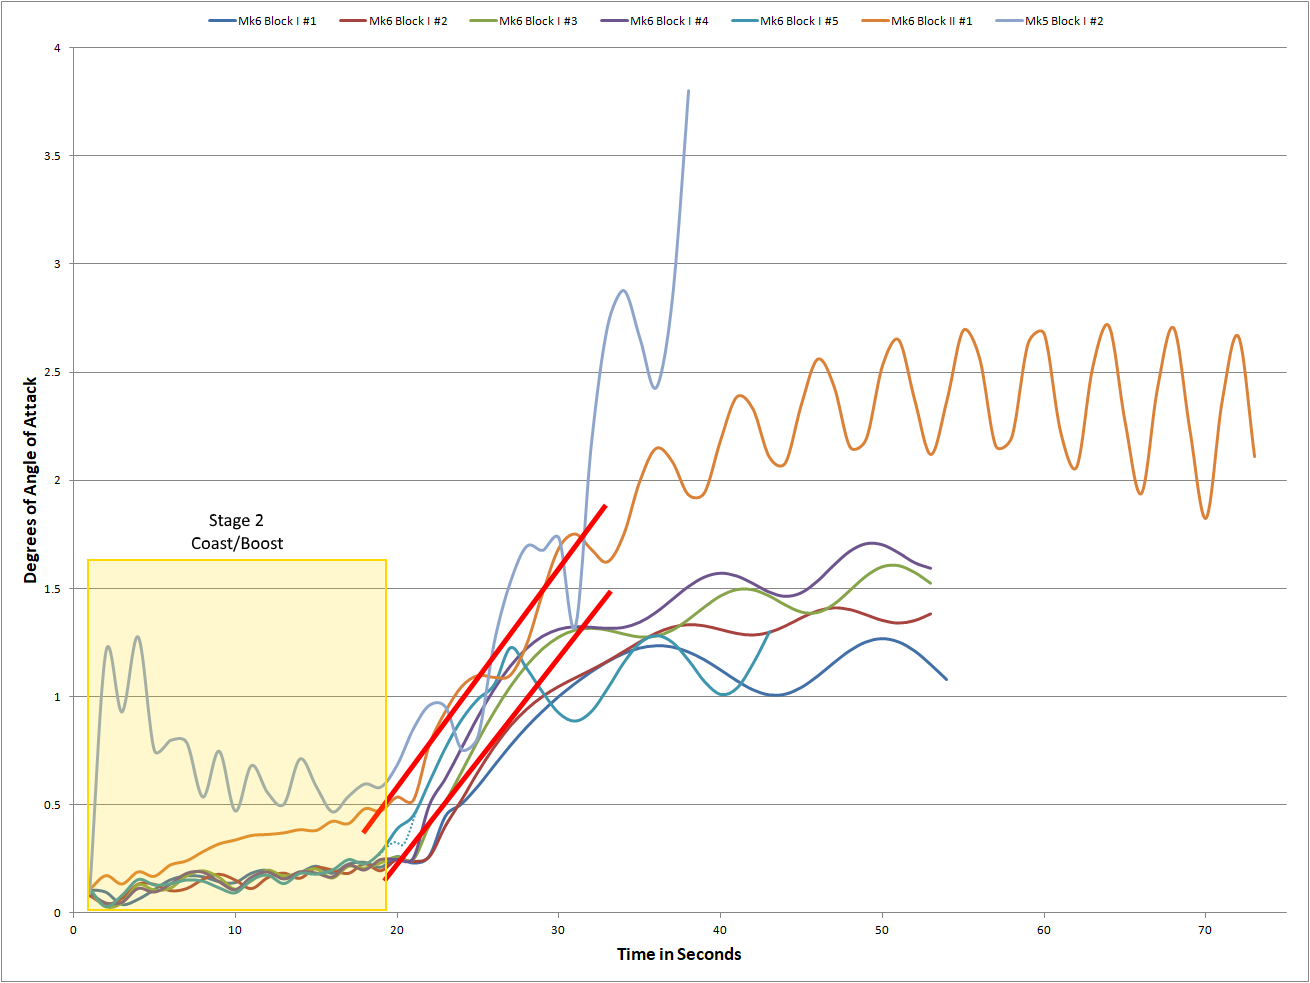
The dotted blue line for the Mk6 Block I #5 is a best guess to fill in for lack of data due to comms blackout from heating and no recovery of the rocket
It’s clear that something occurred during the stage separation to set this flight apart from the Block I launches. The closest we have to an event like this is the Mk5 Block I second flight, which had its first stage booster fly up into the second stage after it was decoupled. We see the rocket recover well and probably would not have spun out to such extremes so quickly had it not been exiting the atmosphere at that point, whereas the Block II was lower when its 3rd stage ignited. We see similar average increases to AoA once the second stage is decoupled, so we are fairly certain the first stage is to blame.
Best theory is that the second stage engine is making slight contact with its shroud. Why this isn’t a problem with the Block I may be to do with the fact that it drops its first stage lower in the atmosphere where the air is denser, which allows the first stage to be dragged away faster and also allow the fins to better stabilize the rocket afterwards. There’s also the pitch angle at which the stage is dropped to be considered. For the first 4 Block I flights the pitch at first stage separation was 75°, whereas the pitch at separation for the Block II was a slightly flatter 74°. This may seem inconsequential but the 5th flight of the Block I separated its first stage at just 70° of pitch (it launched slightly nose-down due to the soft turf, leaving the launch base at 83° instead of 85°), and you will notice it has the largest AoA wobble going into the final boost.
Well, theories aside there’s only one way to find out! The rocket won’t lose much of its aerodynamic shape with the removal of the engine shroud, which does not provide any structural support.
Surprise Recovery
In addition to modeling the launch, attempts were made to determine if it was even feasible that the rocket would survive the fall back to Kerbin from heights of ~1Mm. In no situation where the rocket re-entered as planned (straight up and down engine first) did we see a successful recovery, mainly due to the stress of G forces, although temperature extremes were also likely to destroy the rocket. Therefore we neglected to bother attempting any air braking and just wait until we had some hard data to work with. Needless to say, everyone was shocked at the outcome of the actual flight.
Even though the rocket wasn’t destroyed, it did break apart due to G forces as we had surmised it would, so that’s a double-win in our book. Being mostly sideways when stresses reached their limits allowed for a cleaner break of the lower half of the rocket taking the majority of the strain with it. None of it impacting the upper half, that section being more rigid was able to hang on through the remainder of the descent. The temperatures were still intense at that point and had the probe core casing not been reinforced for radiation shielding it likely would have not survived. As it is, although it wasn’t destroyed completely it will still require a good deal of repairs.
Ultimately, we feel we were just lucky rather than shown a way to return something from extreme altitudes. Anything higher than 1Mm should be considered a write-off as it will either break apart or burn up on re-entry.
Primary Goal Achieved
The primary mission goal of attempting to find an upper boundary to the region of hazardous radiation was successful, much to the joy of our scientists. You can read more about how this helped further refine scientist’s ideas about the nature of this region of space in this article published earlier in the week.
Future Plans
The main issue that needs to be resolved for the next flight is power requirements. The ascent was cut off early because not only would traveling beyond 1Mm reduce the chances of comm coverage throughout the mission, the rocket would have run out of power before it came back down. We estimate the rocket could have reached almost as high as 3.5Mm, which would have meant a mission of nearly three hours – this one lasted only 37 minutes and returned with just under 20% power. However some of that time was spent falling back to Kerbin while slowly descending under chute. What if we operated the mission only on the way up? If we only flew with the radiation instrument, an extra 60EC battery in the last open truss slot, crammed 5 20EC batteries into the nose cone instead of packing a parachute, didn’t fully test the batteries (2.5EC is drained per battery to ensure they discharge properly – that could be cut to 0.5EC) and kept the rocket hooked to ground power until lift off, given the average power cost during the space coast phase of 0.145EC (adding the extra power draw for a more powerful transmitter) we are looking at a mission length of just under 1 hour.
That of course might not even get us up to apokee, so more drastic measures would have to be taken, such as suspending the probe core to reduce its power draw, powering up to log new telemetry data only once per minute instead of once per second and switching off the transmitter until the internal disk is full before downlinking the data in one chunk then going silent again. This will require some hardware and software modifications to the flight computer and is currently being looked into.
As it stands right now, we can’t see a good reason to launch the second Block II until we know we can carry out a mission to the fullest potential, which would mean letting it burn completely through its fuel and get us data for the entire duration of its stay in space, even if that forsakes recovery. Once we can launch again, the only change made will be to remove the engine shroud for the second stage booster.
